Quantcast
Channel: Official Serenity BDD Automated Acceptance Testing Blog » Tips and Tricks
Viewing all 31 articles
Browse latest View live

It ain’t just reds and greens: Automated Acceptance Testing and quaternary test outcomes

$
0
0

Although they seem simple enough on the surface, test outcomes are actually quite complicated beasts. Traditional unit tests, and basic TDD tests, have just two states, passing or failing, represented by red and green in the famous “RED-GREEN-REFACTOR” dicton. In Behaviour Driven Development (BDD), on the other hand, we have the additional concept of ‘pending’ tests: tests that have been specified (for example, in a Cucumber or JBehave story) but not yet implemented. When we report on test results, we need to be able to distinguish these three states, as a pending test has very different semantics to a failing test. Pending means it’s not yet done yet, but this may well be as expected, especially towards the start of a sprint. A failing test, on the other hand, needs fixing. Now.

Most BDD tools, such as Cucumber, JBehave, Concordion, easyb and so forth, report test results in terms of these three states. However, the complexity doesn’t stop here. Maintaining web tests, for example, requires ongoing effort, and can perturb the test reporting if not handed with care. For example, if a web page changes during normal development or refactoring work, the tests that use this page may break. Although good software engineering practices such as the use of Page Objects can reduce the risk of this quite a bit, and reduce the work involved in maintaining the tests when it does, it is still something that will happen regularly. And again, the semantics of a test that is broken is quite different to those of a failing test. A broken test needs maintenance work on the test suite. It may also mask an application error, but you will need to investigate to find out. A failing test means that the application is broken, and therefore needs urgent fixing.

In an attempt to address this limitation in conventional BDD reporting, Thucydides now distinguishes between test failures (triggered by an assertion error) from test errors (triggered by any other exception). When you run your automated acceptance tests using Thucydides, any error that triggers an AssertionError (or a subclass of AssertionError) will be considered a test failure. Anything else (such as the NotFoundException, when an element is not found on the page) is considered to be an error, and therefore indicative of a broken test.

In the future we may extend Thucydides further to make this concept more configurable: for example, so that users can provide exceptions that should be considered as either an error or a test failure, or even adding additional outcome states (e.g infrastructure failure, database not setup, etc.).


Thucydides Release 0.9.125

$
0
0

We made several minor releases in the last two months.  The latest release version is 0.9.125 which is now available for download. Here is a list of some of the key features and bug fixes added recently.

More flexible Examples tables for data-driven tests on the details page

Examples table now supports pagination, sorting of columns and text search.

Examples table with pagination, sorting and text search

Examples table with pagination, sorting and text search

Better handling of foreign characters in reports

Reports now display non-English characters properly.

Before

Before

After

After

Test results can be downloaded

The main report page now has a link to download test results in CSV format.

Test results can be downloaded in CSV format

Test results can be downloaded in CSV format

Fluent field entry using into a WebElementFacade

A new method has been added to provide a more fluid way to enter data in a web element facade. The following code snippet will explain.


...

page.enter("some value").into(facade);

...

Support for GivenStories in jBehave stories

jBehave style GivenStories keyword can now be used in .story files. GivenStories is used to specify pre-requisites for a story in jBehave. This is a very useful feature of jBehave that helps organize the stories better and reduces duplication. See here for examples.

Filter tests by tag in jUnit

You can now filter tests by tag while running Thucydides. This can be achieved by providing a single tag or a comma separated list of tags from command line. If provided, only classes and/or methods with tags in this list will be executed.

Example:

mvn verify -Dtags="iteration:I1"

or

mvn verify -Dtags="color:red,flavor:strawberry"

Support for jUnit Assumptions

If steps include junit style assumptions, then those steps where the conditions under assumptions fail are marked as PENDING instead of ERROR. Subsequent steps are also marked as PENDING.

Bug Fixes

  • Thucydides-146: Fixed a bug that caused chromedriver to fail with error message “Error communicating with the remote browser. It may have died” when @Managed(uniqueSession) was set to true.
  • Thucydides-149: Fixed a bug due to which test where no steps were executed due to error was reported as pending in the aggregate report.
  • Thucydides-150: Tests where no steps ae executed due to errors now show relevant exception cause in the report. Earlier the test was reported as error but no details were provided.
  • Thucydides-152 : XML reports now support UTF-8 encoding.
  • Thucydides-155: Fixed a bug that prevented webdriver from correctly restarting for parameterized tests even when thucydides.restart.browser.frequency property is set to 1
  • Thucydides-158 : Fixed a bug that was causing reports to throw errors for data-driven tests when @TestData contained an array.

Thucydides Release 0.9.229

$
0
0

There have been many releases since the last release notes were published, so this entry will summarize some of the highlights that are included in release 0.9.229 (though many came out in releases previous to that). Some of the highlights include:

  • Added support for Selenium 2.39.0
  • Testing AngularJS is made easier with support for the ng-model attribute in the Thucydides @FindBy annotation. Suppose you have this AngularJS input field:
<input ng-model="angularField" value="Model value" />

You can now find this directly using the Thucydides @FindBy:

import net.thucydides.core.annotations.findby.FindBy
 @FindBy(ngModel = "angularField")
 public WebElementFacade ngModelField;
  • Support for nested page objects – you can have page object fields inside other page objects. This makes it easier to write page objects for smaller reusable sections of the screen.
  • You don’t need to override the constructors for ScenarioSteps and PageObjects any more
  • You can provide your own webdriver instance using the ‘webdriver.provided.type’. Just implement the DriverSource interface. For example, you could implement a class like this:
package com.acme
public class MyFunkyDriverSourceImpl implements DriverSource {
    public WebDriver newDriver() {
       return new FunkyWebDriver();
    }
}

Then just run the tests with the following properties (e.g. in the thucyiddes.properties file or on the command line):

webdriver.driver = provided
 webdriver.provided.type = funky
 webdriver.provided.funky = com.acme.MyFunkyDriverSourceImpl
  • Lots of improvements to the reports, including:
    • Reports now have the option to hide the pie chart on the aggregate pages
    • Test reports now display the date and time of the report generation on each page.
    • You can use the ‘show.related.tags’ system property to display (default) or hide related tag statistics on the dashboard
    • Support for reporting on releases/versions by integrating with JIRA (there will be a full article on this feature shortly)
    • Support for integration with 3rd party test management software such as the JIRA Zephyr plugin to report on manual as well as automated tests
  • Many bug fixes

If you are still on an older version, update your dependencies today!


Thucydides version 0.9.235 Released

$
0
0

A new version of Thucydides is out (version 0.9.235), with bug fixes and new features!

Bug fixes

The bug fixes include:

  • THUCYDIDES-226 and THUCYDIDES-224: You can now pass arbitrarily complex chrome switches in the ‘chrome.switches’ property, containing spaces, commas etc, e.g.
    –user-agent=Mozilla/5.0 (Linux; Android 4.0.4; Galaxy Nexus Build/IMM76B)AppleWebKit/535.19 (KHTML, like Gecko) Chrome/18.0.1025.133 MobileSafari/535.19
  • THUCYDIDES-215 – Provided drivers can take screenshots
  • THUCYDIDES-225 – The webdriver.timeouts.implicitlywait system property now works to configure the timeout value of a PageObject.
  • THUCYDIDES-223 – You can now pass absolute path values in the thucydides.driver.capabilities system property.
  • Session data and step libraries are cleared between unit tests: A bug in previous versions of Thucydides meant that session data (accessed via the Thucydides.getCurrentSession() method) and step libraries were preserved between session states. This could occasionally cause problems, so session data is now cleared between each test in both JUnit and JBehave. This can be deactivated by setting the ‘thucydides.maintain.session’ property to true. Step libraries are now always reinitialized between scenarios or tests.

    THUCYDIDES-215 deserves some more detail. You can add your own custom WebDriver provider by implementing the DriverSource interface. First, you need to set up the following system properties (e.g. in your ‘thucydides.properties’ file):

    webdriver.driver = provided
    webdriver.provided.type = mydriver
    webdriver.provided.mydriver = com.acme.MyPhantomJSDriver
    thucydides.driver.capabilities = mydriver

    Previously, it was hard to configure Thucydides to take screenshots using provided drivers. Now, you implement the DriverSource interface (as before), but with the new takesScreenshots() method:

    public class MyPhantomJSDriver implements DriverSource {
    
        @Override
        public WebDriver newDriver() {
            try {
                DesiredCapabilities capabilities = DesiredCapabilities.phantomjs();
    
                // doesn't work :(
                capabilities.setCapability(CapabilityType.TAKES_SCREENSHOT, true);
    
                return new PhantomJSDriver(ResolvingPhantomJSDriverService.createDefaultService(),
                        capabilities);
            }
            catch (IOException e) {
                throw new Error(e);
            }
        }     
    
    	@Override
        public boolean takesScreenshots() {
            return true;
        }
    }

    This driver will now take screenshots normally.

    New Features

    And two cool new features:

    Custom messages for WebElementFacade assertions

    Normally, to check the state of a WebElementFacade, you do something like this:

    @FindBy(css=".whatever")
    WebElementFacade myfield;
    ...
    myField.shouldBeVisible();

    But in this case, the error message was always the same. Now you can also do this:

    myField.expect("My field should be visible").shouldBeVisible();

    This will work for any of the "should"-style methods (shouldBeVisible, shouldContainText, etc.).

    Clever reuse of screenshots

    In previous versions, Thucydides recorded a different set of screenshots for each test run. This could lead to a lot of screenshots and the need for very large disks. Now, if screenshots are identical (i.e. if they have the same MD5 digest), the same file will be used.


BDD Requirements Management with JBehave, Thucydides and JIRA – Part 1

$
0
0

Thucydides is an open source library designed to make practicing Behaviour Driven Development easier. Thucydides plays nicely with BDD tools such as JBehave, or even more traditional tools like JUnit, to make writing automated acceptance tests easier, and to provide richer and more useful living documentation. In a series of two articles, we will look at the tight one and two-way integration that Thucydides offers with JIRA.

The rest of this article assumes you have some familiarily with Thucydides. For a tutorial introduction to Thucydides, check out the Thucydides Documentation or this article for a quick introduction.

Getting started with Thucydides/JIRA integration

Atlassian JIRA

JIRA is a popular issue tracking system that is also often used for Agile project and requirements management. Many teams using JIRA store their requirements electronically in the form of story cards and epics in JIRA

Suppose we are implementing a Frequent Flyer application for an airline. The idea is that travellers will earn points when they fly with our airline, based on the distance they fly. Travellers start out with a “Bronze” status, and can earn a better status by flying more frequently. Travellers with a higher frequent flyer status benefit from advantages such as lounge access, prioritized boarding, and so on. One of the story cards for this feature might look like the following:

images/jira-story.png

This story contains a description following one of the frequently-used formats for user story descriptions (“as a..I want..so that”). It also contains a custom “Acceptance Criteria” field, where we can write down a brief outline of the “definition of done” for this story.

These stories can be grouped into epics, and placed into sprints for project planning, as illustrated in the JIRA Agile board shown here:

images/jira-agile.png

As illustrated in the story card, each of these stories has a set of acceptance criteria, which we can build into more detailed scenarios, based on concrete examples. We can then automate these scenarios using a BDD tool like JBehave.

The story in Figure 1 describes how many points members need to earn to be awarded each status level. A JBehave scenario for the story card illustrated earlier might look like this:

Frequent Flyer status is calculated based on points

Meta:
@issue FH-17

Scenario: New members should start out as Bronze members
Given Jill Smith is not a Frequent Flyer member
When she registers on the Frequent Flyer program
Then she should have a status of Bronze

Scenario: Members should get status updates based on status points earned
Given a member has a status of <initialStatus>
And he has <initialStatusPoints> status points
When he earns <extraPoints> extra status points
Then he should have a status of <finalStatus>
Examples:
| initialStatus | initialStatusPoints | extraPoints | finalStatus | notes                    |
| Bronze        | 0                   | 300         | Silver      | 300 points for Silver    |
| Silver        | 0                   | 700         | Gold        | 700 points for Gold      |
| Gold          | 0                   | 1500        | Platinum    | 1500 points for Platinum |

Thucydides lets you associate JBehave stories or JUnit tests with a JIRA card using the @issue meta tag (illustrated above), or the equivalent @Issue annotation in JUnit. At the most basic level, this will generate links back to the corresponding JIRA cards in your test reports, as illustrated here:

images/jira-test-report.png

For this to work, Thucydides needs to know where your JIRA server. The simplest way to do this is to define the following properties in a file called thucydides.properties in your project root directory:

jira.url=https://myserver.atlassian.net
jira.project=FH
jira.username=jirauser
jira.password=t0psecret

You can also set these properties up in your Maven pom.xml file or pass them in as system properties.

Thucydides also supports two-way integration with JIRA. You can also get Thucydides to update the JIRA issue with a comment pointing to the corresponding test result.

Feature Coverage

But test results only report part of the picture. If you are using JIRA to store your stories and epics, you can use these to keep track of progress. But how do you know what automated acceptance tests have been implemented for your stories and epics, and, equally importantly, how do you know which stories or epics have no automated acceptance tests? In agile terms, a story cannot be declared “done” until the automated acceptance tests pass. Furthermore, we need to be confident not only that the tests exist, but they test the right requirements, and that they test them sufficiently well.

We call this idea of measuring the number (and quality) of the acceptance tests for each of the features we want to build “feature coverage”. Thucydides can provide feature coverage reporting in addition to the more conventional test results. If you are using JIRA, you will need to add thucydides-jira-requirements-provider to the dependencies section of your pom.xml file:

        <dependencies>
            ...
            <dependency>
                <groupId>net.thucydides.plugins.jira</groupId>
                <artifactId>thucydides-jira-requirements-provider</artifactId>
                <version>0.9.262</version>
            </dependency>
        </dependencies>

(The actual version number might be different for you – always take a look at Maven Central to know what the latest version is).

You will also need to add this dependency to the Thucydides reporting plugin configuration:

        <build>
            ...
            <plugins>
                ...
                <plugin>
                    <groupId>net.thucydides.maven.plugins</groupId>
                    <artifactId>maven-thucydides-plugin</artifactId>
                    <version>0.9.262</version>
                    <executions>
                        <execution>
                            <id>thucydides-reports</id>
                            <phase>post-integration-test</phase>
                            <goals>
                                <goal>aggregate</goal>
                            </goals>
                        </execution>
                    </executions>
                    <dependencies>
                        <dependency>
                            <groupId>net.thucydides.plugins.jira</groupId>
                            <artifactId>thucydides-jira-requirements-provider</artifactId>
                            <version>0.9.262</version>
                        </dependency>
                    </dependencies>
                </plugin>
            </plugins>
        </build>

Now, when you run the tests, Thucydides will query JIRA to determine the epics and stories that you have defined, and list them in the Requirements page. This page gives you an overview of how many requirements (epics and stories) have passing tests (green), how many have failing (red) or broken (orange) tests, and how many have no tests at all (blue):

images/requirements-view.png

If you click on an epic, you can see the stories defined for the epic, including an indicator (in the “Coverage” column) of how well each story has been tested.

images/epic-details.png

From here, you may want to drill down into the details about a given story, including what acceptance tests have been defined for this story, and whether they ran successfully:

images/story-report.png

Both JIRA and the JIRA-Thucydides integration are quite flexible. We saw earlier that we had configured a custom “Acceptance Criteria” field in our JIRA stories. We have displayed this custom field in the report shown above by including it in the thucydides.properties file, like this:

jira.custom.field.1=Acceptance Criteria

Thuydides reads the narrative text appearing in this report (“As a frequent flyer…”) from the Descriptionfield of the corresponding JIRA card. We can override this behavior and get Thucydides to read this value from a different custom field using the jira.custom.narrative.field property. For example, some teams use a custom field called “User Story” to store the narrative text, instead of the Description field. We could get Thucydides to use this field as follows:

jira.custom.narrative.field=User Story

Conclusion

Thucydides has rich and flexible one and two-way integration with JIRA. Not only can you link back to JIRA story cards from your acceptance test reports and display information about stories from JIRA in the test reports, you can also read the requirements structure from JIRA, and report on which features have been tested, and which have not.

In the next article in this series, we will learn how to insert links to the Thucydides reports into the JIRA issues, and how to actively update the state of the JIRA cards based on the outcomes of your tests.

Want to learn more? Be sure to check out the Thucydides web site, the Thucydides Blog, or join theThucydides Google Users Group to join the discussion with other Thucydides users.

Wakaleo Consulting, the company behind Thucydides, also runs regular courses in Australia, London and Europe on related topics such as Agile Requirements GatheringBehaviour Driven DevelopmentTest Driven Development, and Automated Acceptance Testing.


BDD Requirements Management with JBehave, Thucydides and JIRA – Part 2

$
0
0

Thucydides is an open source library designed to make practicing Behaviour Driven Development easier. Thucydides plays nicely with BDD tools such as JBehave, or even more traditional tools like JUnit, to make writing automated acceptance tests easier, and to provide richer and more useful living documentation. In this series of articles, we look at the tight one and two-way integration that Thucydides offers with JIRA. The first article discussed basic one-way integration with JIRA. In this article, we will looking at taking that integration further. We will see how to insert links to the Thucydides reports into JIRA, how to update the state of JIRA issues based on the Thucydides test outcomes, and how to report on JIRA versions and releases in the Thucydides reports.

The rest of this article assumes you have some familiarily with Thucydides. For a tutorial introduction to Thucydides, check out the Thucydides Documentation or this article for a quick introduction.

The simplest form of two-way integration between Thucydides and JIRA is to get Thucydides to insert a comment containing links to the Thucydides test reports for each related issue card. To get this to work, you need to tell Thucydides where the reports live. One way to do this is to add a property calledthucydides.public.url to your thucydides.properties file with the address of the thucydides reports.

thucydides.public.url=http://buildserver.myorg.com/latest/thucydides/report

This will tell Thucydides that you not only want links from the Thucydides reports to JIRA, but you also want to include links in the JIRA cards back to the corresponding Thucydides reports. When this property is defined, Thucydides will add a comment like the following to any issues associated with the executed tests:

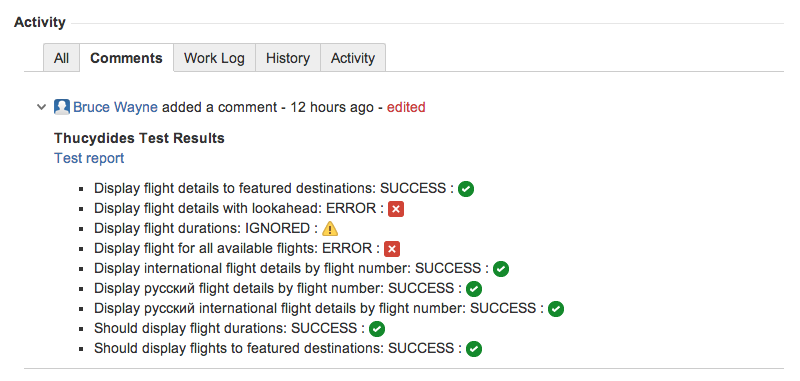
images/jira-thucydides-comment.png

The thucydides.public.url will typically point to a local web server where you deploy your reports, or to a path within your CI server. For example you could publish the Thucydides reports on Jenkins using theJenkins HTML Publisher Plugin, and then add a line like the following to your thucydides.properties file:

thucydides.public.url=http://jenkins.myorg.com/job/myproject-acceptance-tests/Thucydides_Report/

If you do not want Thucydides to update the JIRA issues for a particular run (e.g. when running your tests locally), you can also set thucydides.skip.jira.updates to true, e.g.

thucydides.skip.jira.updates=true

This will simply write the relevant issue numbers to the log rather than trying to connect to JIRA.

Updating JIRA issue states

You can also configure the plugin to update the status of JIRA issues. This is deactivated by default: to use this option, you need to set the thucydides.jira.workflow.active option to true, e.g.

thucydides.jira.workflow.active=true

The default configuration will work with the default JIRA workflow: open or in progress issues associated with successful tests will be resolved, and closed or resolved issues associated with failing tests will be reopened. If you are using a customized workflow, or want to modify the way the transitions work, you can write your own workflow configuration. Workflow configuration uses a simple Groovy DSL. The following is an example of the configuration file used for the default workflow:

    when 'Open', {
        'success' should: 'Resolve Issue'
    }

    when 'Reopened', {
        'success' should: 'Resolve Issue'
    }

    when 'Resolved', {
        'failure' should: 'Reopen Issue'
    }

    when 'In Progress', {
        'success' should: ['Stop Progress','Resolve Issue']
    }

    when 'Closed', {
        'failure' should: 'Reopen Issue'
    }

You can write your own configuration file and place it on the classpath of your test project (e.g. in theresources directory). Then you can override the default configuration by using thethucydides.jira.workflow property, e.g.

thucydides.jira.workflow=my-workflow.groovy

Alternatively, you can simply create a file called jira-workflow.groovy and place it somewhere on your classpath (e.g. in the src/test/resources directory). Thucydides will then use this workflow. In both these cases, you don’t need to explicitly set the thucydides.jira.workflow.active property.

Release management

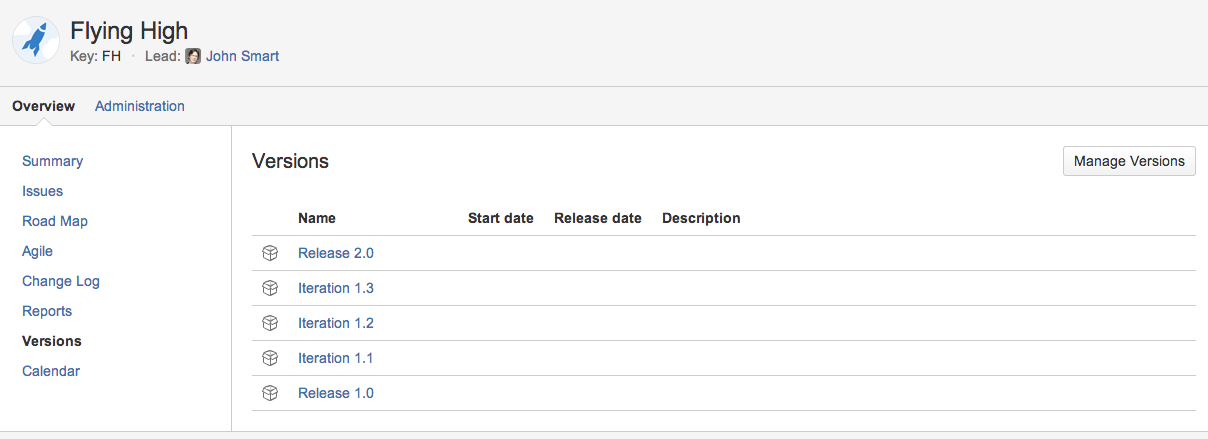
In JIRA, you can organize your project releases into versions, as illustrated here:

images/jira-versions.png

You can and assign cards to one or more versions using the Fix Version/s field:

images/jira-fix-versions.png

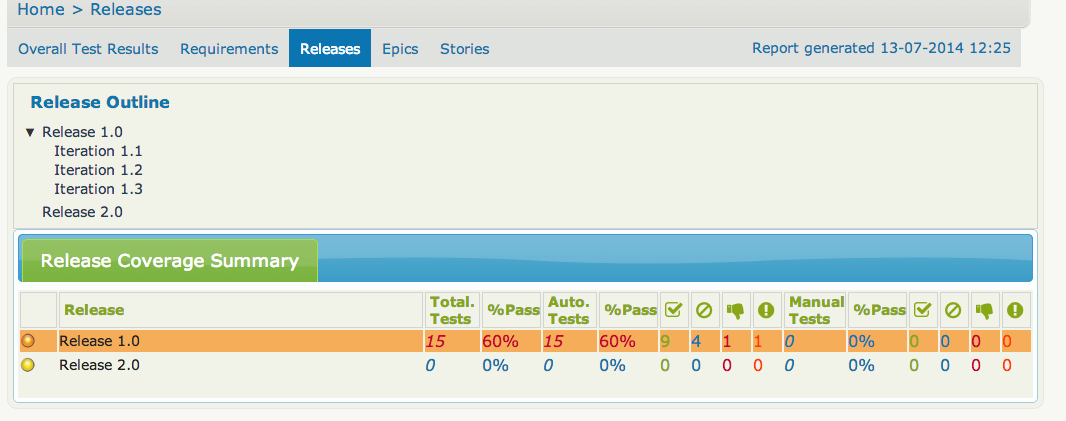
By default, Thucydides will read version details from the Releases in JIRA. Test outcomes will be associated with a particular version using the “Fixed versions” field. The Releases tab gives you a run-down of the different planned versions, and how well they have been tested so far:

images/releases-tab.png

JIRA uses a flat version structure – you can’t have for example releases that are made up of a number of sprints. Thucydides lets you organize these in a hierarchical structure based on a simple naming convention. By default, Thucydides uses “release” as the highest level release, and either “iteration” or “sprint” as the second level. For example, suppose you have the the following list of versions in JIRA – Release 1 – Iteration 1.1 – Iteration 1.2 – Release 2 – Release 3

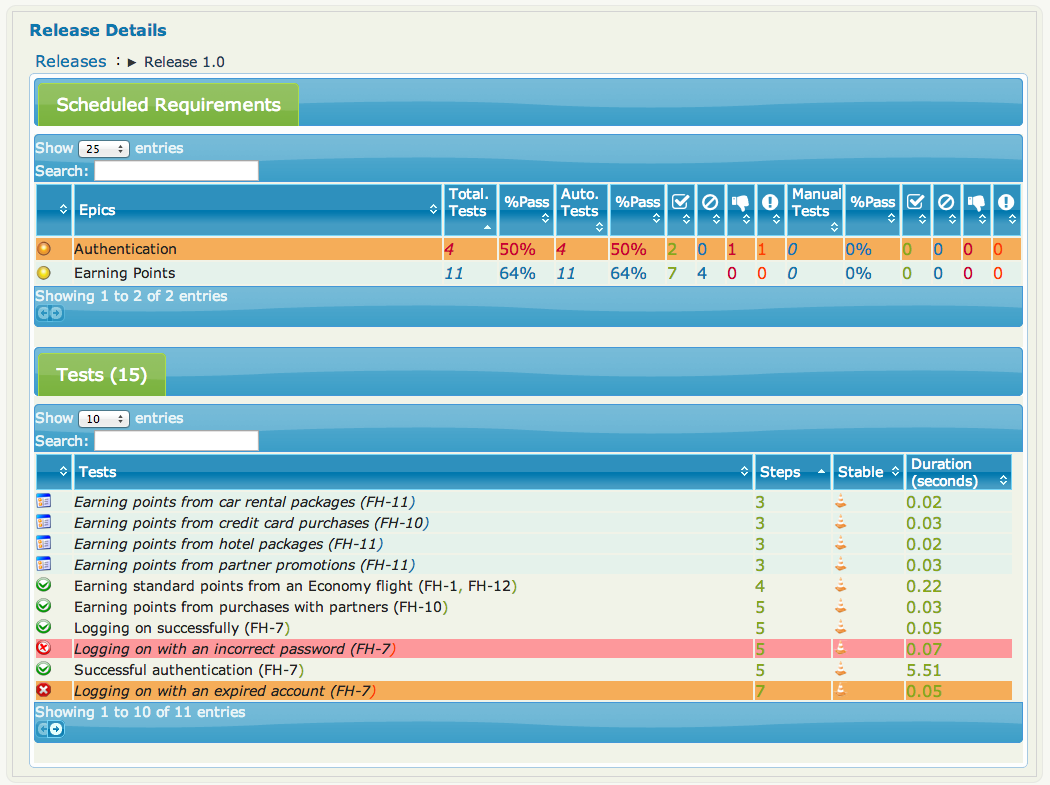
This will produce Release reports for Release 1, Release 2, and Release 3, with Iteration 1.2 and Iteration 1.2 appearing underneath Release 1. The reports will contain the list of requirements and test outcomes associated with each release. You can drill down into any of the releases to see details about that particular release

images/releases.png

You can also customize the names of the types of release usinge the thucydides.release.typesproperty, e.g.

thucydides.release.types=milestone, release, version

Conclusion

Thucydides has powerful one and two-way integration with JIRA. In these articles, we have seen how you can incoporate links from Thucydides to JIRA, from JIRA to Thucyides, and even update the status of issues in JIRA based on the test results. And, if you are managing your versions in JIRA, you can also report on how well each version has been tested, and what remains to be tested before the next release.

Want to learn more? Be sure to check out the Thucydides web site, the Thucydides Blog, or join theThucydides Google Users Group to join the discussion with other Thucydides users.

Wakaleo Consulting, the company behind Thucydides, also runs regular courses in Australia, London and Europe on related topics such as Agile Requirements GatheringBehaviour Driven DevelopmentTest Driven Development, and Automated Acceptance Testing.


Handling work-in-progress with Thucydides and JBehave using @pending and @wip tags

$
0
0

Thucydides version 0.9.268 has just been released, with a few very interesting new features. Thucydides is an open source reporting library that helps you write more effective BDD-style automated acceptance criteria, and generate richer test reports, requirements reports and living documentation. In this article, we will look at some of the new ways this version lets you handle work-in-progress or pending scenarios with Thucydides and JBehave.

In JBehave, a scenario is considered passing if all of the step definitions are implemented, even if there is no code. This is because there is no obligation to use step libraries within the step definitions, though it is a good practice for more complex tests. Consider the following scenario:

Scenario: Logging on via Facebook
Given Joe is a Frequent Flyer member
And Joe has registered online via Facebook
When Joe logs on with a Facebook token
Then he should be given access to the site

When you execute this with no step definitions, it will be reported as Pending, as illustrated here:

pending_steps

When you implement the steps, they will be considered successful unless an exception is thrown or a step is marked as pending. So the following will indeed pass:

    @Given("$username has registered online via Facebook")
    public void has_registered_via_facebook(String username) {}

This is because there is no way to know that a step definition is empty – we can only know that no @Step methods were called, which does not necessarily mean that it is empty.

You can make this a pending step by using the org.jbehave.core.annotations.Pending pending annotation, e.g:

    @Pending
    @Given("$username has registered online via Facebook")
    public void has_registered_via_facebook(String username) {}

JBehave and Thucydides will now report this scenario as pending, even though it has an “implemented” (albeit empty) step definition:

step-details

This is also a good way to keep track of work if you are driving the code from the step definitions, as you can easily see which steps have been done at any point in time.

The @ignore tag lets you skip a story during test execution, so that it does not appear in the reports.

Meta:
@ignore

Scenario: Logging on via Facebook
Given Joe is a Frequent Flyer member
And Joe has registered online via Facebook
When Joe logs on with a Facebook token
Then he should be given access to the site

If you want a scenario to appear in the report, but to mark it as ‘pending’ even if it fails, you can use the @pending tag directly within the story files, e.g.

Meta:
@pending

Scenario: Logging on via Facebook
Given Joe is a Frequent Flyer member
And Joe has registered online via Facebook
When Joe logs on with a Facebook token
Then he should be given access to the site

Scenario: Logging on via Twitter
Given Joe is a Frequent Flyer member
And Joe has registered online via Facebook
When Joe logs on with a Facebook token
Then he should be given access to the site

or, for an individual scenario:

Scenario: Logging on via Facebook
Meta:
@pending

Given Joe is a Frequent Flyer member
And Joe has registered online via Facebook
When Joe logs on with a Facebook token
Then he should be given access to the site

In this case, the entire scenario or story/feature will be reported as ‘pending':

Screen Shot 2014-08-20 at 4.48.10 pm

You can also distinguish between work that hasn’t been started yet and work that is in progress but not yet complete. The @skip or @wip tags will act like the @pending tag, but will report the scenario or story as “skipped”.

Scenario: Logging on via Facebook
Meta:
@wip

Given Joe is a Frequent Flyer member
And Joe has registered online via Facebook
When Joe logs on with a Facebook token
Then he should be given access to the site

These will appear differently in the reports, as shown here:

Screen Shot 2014-08-20 at 5.10.59 pm

This is a good way to identify what features are currently being worked on.

The following table summaries these options:

What Where Outcome
@Pending annotation Step definition code Individual step is flagged as ‘pending’
@pending tag Scenario metadata in the .story file The whole scenario is flagged as ‘pending’
@pending tag Story metadata in the .story file All the scenarios in the story file are flagged as ‘pending’
@skip or @wip tag Scenario metadata in the .story file The whole scenario is flagged as ‘skipped’
@skip or @wip tag Story metadata in the .story file All the scenarios in the story file are flagged as ‘skipped’
@ignore tag Story or scenario metadata in the .story file The story/scenario will not be executed and will not appear in the reports


Serenity 1.0.42 and the new Timeout API

$
0
0

Serenity core 1.0.42 is out, with a major overhaul to implicit and explicit timeouts, making the timeout behaviour more consistent and more flexible.

Modern AJAX-based web applications add a great deal of complexity to web testing. The basic problem is, when you access a web element on a page, it may not be available yet. So you need to wait a bit. Indeed, many tests contain hard-coded pauses scattered through the code to cater for this sort of thing.

But hard-coded waits are evil. They slow down your test suite, and cause them to fail randomly if they are not long enough. Rather, you need to wait for a particular state or event. Selenium provides great support for this, and Serenity builds on this support to make it easier to use.

Implicit Waits

The first way you can manage how WebDriver handles tardy fields is to use the  webdriver.timeouts.implicitlywait property. This determines how long, in milliseconds, WebDriver will wait if an element it tries to access is not present on the page. To quote the WebDriver documentation:

“An implicit wait is to tell WebDriver to poll the DOM for a certain amount of time when trying to find an element or elements if they are not immediately available.”

The default value in Serenity for this property is currently 2 seconds. This is different from standard WebDriver, where the default is zero.

Let’s look at an example. Suppose we have a PageObject with a field defined like this:

@FindBy(id="slow-loader")
public WebElementFacade slowLoadingField;

This field takes a little while to load, so won’t be ready immediately on the page.

Now suppose we set the webdriver.timeouts.implicitlywait value to 5000, and that our test uses the slowLoadingField:

boolean loadingFinished = slowLoadingField.isDisplayed()

When we access this field, two things can happen. If the field takes less than 5 seconds to load, all will be good. But if it takes more than 5 seconds, a NoSuchElementException (or something similar) will be thrown.

That this timeout also applies for lists. Suppose we have defined a field like this, which takes some time to dynamically load:

@FindBy(css="#elements option")
public List<WebElementFacade> elementItems;

Now suppose we count the values of the element like this:

int itemCount = elementItems.size()

The number of items returned will depend on the implicit wait value. If we set the webdriver.timeouts.implicitlywait value to a very small value, WebDriver may only load some of the values. But if we give the list enough time to load completely, we will get the full list.

The implicit wait value is set globally for each WebDriver instance, but you can override the value yourself. The simplest way to do this from within a Serenity PageObject is to use the setImplicitTimeout() method:

setImplicitTimeout(5, SECONDS)

But remember this is a global configuration, so will also affect other page objects. So once you are done, you should always reset the implicit timeout to its previous value. Serenity gives you a handy method to do this:

resetImplicitTimeout()

See http://docs.seleniumhq.org/docs/04_webdriver_advanced.jsp#implicit-waits for more details on how the WebDriver implicit waits work.

Explicit Timeouts

You can also wait until an element is in a particular state. For example, we could wait until a field becomes visible:

slowLoadingField.waitUntilVisible()

You can also wait for more arbitrary conditions, e.g.

waitFor(ExpectedConditions.alertIsPresent())

The default time that Serenity will wait is determined by the webdriver.wait.for.timeout property. The default value for this property is 5 seconds.

Sometimes you want to give WebDriver some more time for a specific operation. From within a PageObject, you can override or extend the implicit timeout by using the withTimeoutOf() method. For example, you could wait for the #elements list to load for up to 5 seconds like this:

withTimeoutOf(5, SECONDS).waitForPresenceOf(By.cssSelector("#elements option"))

You can also specify the timeout for a field. For example, if you wanted to wait for up to 5 seconds for a button to become clickable before clicking on it, you could do the following:

 someButton.withTimeoutOf(5, SECONDS).waitUntilClickable().click()

You can also use this approach to retrieve elements:

elements = withTimeoutOf(5, SECONDS).findAll("#elements option")

Finally, if a specific element a PageObject needs to have a bit more time to load, you can use the timeoutInSeconds attribute in the Serenity @FindBy annotation, e.g.

import net.serenitybdd.core.annotations.findby.FindBy;
...
@FindBy(name = "country", timeoutInSeconds="10")
public WebElementFacade country;

You can also wait for an element to be in a particular state, and then perform an action on the element. Here we wait for an element to be clickable before clicking on the element:

addToCartButton.withTimeoutOf(5, SECONDS).waitUntilClickable().click()

Or, you can wait directly on a web element:

@FindBy(id="share1-fb-like")
WebElementFacade facebookIcon;
  ...
public WebElementState facebookIcon() {
    return withTimeoutOf(5, TimeUnit.SECONDS).waitFor(facebookIcon);
}

Or even:

List<WebElementFacade> currencies = withTimeoutOf(5, TimeUnit.SECONDS)
                              .waitFor(currencyTab)
                              .thenFindAll(".currency-code");

This is just an overview of a few of the ways you can handle asynchronous fields in Serenity – there are many variations around these themes. More detailed documentation will be available soon in the Serenity BDD documentation.


Customizing Cucumber Feature File organization with Serenity

$
0
0
Many Cucumber projects organize their feature files in a single directory. This flat structure will work for very small projects, but in real-world project features typically need to be grouped by more high-level concepts, such as capabilities or epics. Serenity BDD makes this very easy
By default, Serenity uses a two-level hierarchy based on capabilities and features. A capability is represented by a directory, and the features associated with that capability are placed inside that directory.
3039EF3C-29B0-4158-811A-AB81ED1EC42A
If you use a directory structure like this, the “Requirements” tab in the Serenity reports will display a hierarchy of capabilities and features, and aggregate test results for each capability and feature:
3E31D88F-B5DA-48EF-84A2-52B6128A59EB
We can customize the hierarchy using the serenity.requirement.types system property. If we wanted epics instead of capabilities, we could add the following line to our serenity.properties file:
serenity.requirement.types = epic, feature
This would produce epics rather than capabilities in the requirements report:
DB980BC9-365A-48E3-BB31-24CC5903C62D
Now suppose you wanted to add a “theme” level above the epics and features. You could organise the features directory like this:
0AC724A3-4EF6-42DB-81D4-890FF6E53DBE
Then you would configure the serenity.requirement.types property as shown here:
serenity.requirement.types = theme, epic, feature
This would add a “Themes” requirements level above your epics in the Requirements reports.
You can also organize your features into releases, iterations, or sprints. You do this using the version tag. For example, the following feature would be scheduled for Release-2:
@version:Release-2
Feature: Search by keyword
  In order for buyers to find what they are looking for more efficiently
  As a seller
  I want buyers to be able to search for articles by keywords

  Scenario: Search for articles by keyword
    Given I want to buy a wool scarf
    When I search for 'wool'
    Then I should see only articles related to 'wool'
(Note that Cucumber does not like spaces in tags, so you need to write “Release-2” and not “Release 2”).
You can also assign a feature to both a release and a sprint, e.g.
@version:Release-1
@version:Sprint-1.1
Feature: Add item to shopping cart
  As a buyer
  I want to be able to purchase items online
  So that I can get them faster

  Scenario: Add item to cart
    Given I have searched for 'docking station'
    And I have selected item 2
    When I add it to the cart
    Then the item should appear in the cart
    And the shipping cost should be included in the total price
This will produce a “Releases” tab in the reports, similar to the following:
E9F98098-0217-4A73-8503-653A57EB0A49
You can tell Serenity what terms your release organisation uses (e.g. releases then sprints or releases then iterations) using the serenity.release.types system property. For example, if you wanted to use versions, then iterations, you would put the following line in your serenity.properties file:
serenity.release.types = Version,Iteration

A new release of Serenity BDD is out!

$
0
0

Serenity 1.0.47 is out, with a host of improvements and bug fixes. Major items include:

  • Serenity will now automatically detect Cucumber and JBehave requirements directory structures and group the tests according. For Cucumber, feature files are considered to be the lowest level, and directories containing these features will be mapped to capabilities. For JBehave, story files are the lowest level, and produce stories. Directories that contain story files will be mapped to features. Directories above this level will be mapped to capabilities.
  • Added a new containsElements() convenience method to the PageObject class.
  • Added a hasClass() method to the WebElementFacade class, to test whether an element has a particular CSS class.
  • Display the stack trace for failing tests in the test reports.
  • Experimental support for JUnit reports – JUnit-compatible XML reports (usable directly by CI servers like Jenkins) are now generated in the target/site/serenity directory, with the prefix SERENITY-JUNIT.
  • Added support for Cucumber feature files written in non-English language when generating the requirements reports.
  • You can access properties from the Sereniy properties file in a JUnit test simply by declaring a member variable of type `EnvironmentVariables`.
  • Fixed a bug causing screenshots to fail to be recorded in some circumstances.
  • Fixed a bug where tests hung if an invalid selector was used.
  • Many other smaller bug fixes and performance improvements.

The Maven archetypes have also been updated. This new version should be completely backward compatible with previous (recent) versions of Serenity, so take it for a spin and let us know what you think!


Serenity 1.1 is out!

$
0
0

A brand new version of Serenity is out, with bug features and some very cool new features, including fully-integrated feature coverage reporting and the ability to include both manual and automated tests in your reports!

The Serenity team is proud to announce the release of Serenity version 1.1 (the current exact version is 1.1.1, but as is custom with the Serenity project, we like to release in a regular stream of minor features and bug fixes, so check the latest release numbers on Bintray or Maven Central.)

This new release has several major new features, along with a number of bug fixes and improvements. Major new features include:

  • Smooth integration between test reporting and requirements reporting (living documentation)
  • You can now flag tests (in JUnit, Cucumber or JBehave) as manual (more on this further down)

Fully-integrated Requirements Reporting

Serenity is an automated testing and reporting library that tries to implement many key concepts from the world of Behavior Driven Development (BDD) such as Living Documentation and Feature Coverage. One of the main principles behind Serenity reporting is that the value of an automated test is directly related to the value of the feature it is testing. Automated tests are most useful when they demonstrate both that a feature works and that it is doing something valuable for the customer.

Serenity distinguishes between two distinct views of your test results. The first, the test reports, presents the results from the point of view of what tests were executed:

Test reports

These reports also give you an overview of the test results, in terms of the number of passing and failing tests:

Test reports

This representation is a classic list of test results that will be familiar to testers.

The second focuses less on what tests were executed, and more on what features were delivered. If the definition of done ifor the features you want to deliver is accurately described by the acceptance criteria (one of the cornerstones on BDD), and if you automate these acceptance criteria, then you can get a good idea of whether a feature has indeed been delivered from the results of the automated acceptance criteria.

For this to work, Serenity needs to know how your requirements are structured. A flat requirements structure is a poor representation for all but the most simple projects. Well-designed requirement structures help a reader understand what business goal each feature is helping to deliver, or what capability the feature is helping to provide. For this reason, teams often organize features by capability or in some other meaningful functional grouping.

Doing this in Serenity allows you to present a hierarchical view of the requirements, as illustrated here:

Requirements reports

The simplest way to represent a requirements structure in Serenity is to use a hierarchical directory structure, where each top level directory describes a high level capability or functional domain. You might break these directories down further into sub directories representing more detailed functional areas, or just place feature files directly in these directories:

Requirements directory structure using Cucumber

The same thing works for JUnit, except you use packages instead of directories:

Requirements directory structure using JUnit

To get the JUnit package structure to work, you need to set the serenity.test.root system property to the top level package containing your requirements:

serenity.test.root=net.thucydides.showcase.junit.features

When you organize your tests this way, Serenity will show you where each test belongs in the requirements hierarchy:

Test result showing parent requirements

These breadcrumbs let you go directly to the corresponding requirements pages, as illustrated here:

Test result showing parent requirements

Manual tests It is often useful to be able to flag certain tests as manual tests, which are not consider cost-efficient to automate, but which you would still like to see in the overall test reports.

You can mark a JUnit test as a manual one simply by using the @Manual annotation. For example, the following Serenity test class has two automated tests, and one flagged as manual:

@RunWith(SerenityRunner.class)
public class SearchByKeyword {

    @Managed
    WebDriver driver;

    @Steps
    BuyerSteps buyer;

    @Test
    public void search_for_articles_by_keyword() {
        buyer.opens_home_page();
        buyer.searches_by_keyword("wool");
        buyer.should_see_results_summary_containing("wool");
    }

    @Test
    public void search_for_articles_by_shop_name() {
        buyer.opens_home_page();
        buyer.searches_for_shop_called("docksmith");
        buyer.should_see_shop_search_result_summary_of("1 shop found for docksmith");
    }

    @Test
    @Manual
    public void should_respect_standard_look_and_feel() {}

}

In Cucumber, just use the @manual tag on a scenario:

@manual
Scenario: Should respect standard look and feel

You can add the usual Given/When/Then steps if you want some instructions about how to test this scenario in the living documentation, or leave it simply as a place-holder for the tester later on.

And in JBehave, use the @manual tag in the Meta: section of a scenario:

Scenario: Display social media links for a product
Meta:
@manual

Given I have searched for 'Docking station' in my region
When I select item 1
Then I should see social media links

In all cases, the manual test appear in the reports as a special kind of “Pending” test, indicated by a special icon:

Manual tests

Manual tests also have their on tag, making it easy to get a view of all of the manual tests in one place.

Bug fixed and enhancements

There are also a few important bug fixes and enhancements, including:

  • Fixed a thread leak that sometimes caused problems on build servers for large projects.
  • Move the caption for the screenshots to the top of the screen for better readability.
  • Added the deep.step.execution.after.failures system property. This allows you to decide whether @Step methods should simply be skipped after a previous step has failed (the default: this is faster, but it means that only top-level steps will be reported), or if the subsequent steps will be executed in “dry-run” mode (will report on nested steps as well as the top level ones)
  • Upgrades to Appium 3.1.0
  • Improved error and exception reporting for RestAssured tests.

Coming up in the not-so-distant future will be deep JIRA integration, including integration with Zephyr. Older versions of Thucydides supported this integration using the old SOAP API for JIRA and a beta version of the Zephyr API. This has now been completely rewritten using the latest REST APIs for both tools.


Viewing all 31 articles
Browse latest View live